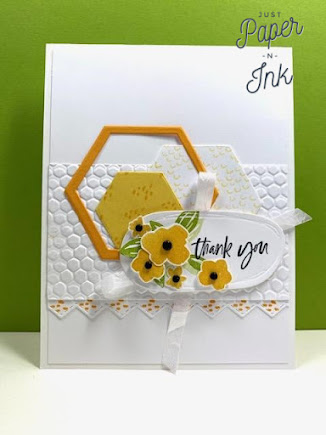
Hello Beautiful~Thank You
CUTTING & SCORING
-Basic White Thick: 11 x 4-1/4" scored at 5-1/2"
-Basic White: 5'1/4" x 4" and 2-1/2" x 4". Die cut largest oval. Die cut second largest hexagon. Die cut border image.
-Mango Melody: hexagon outline using largest and next smaller layering dies.
-Daffodil Delight: Die cut smallest hexagon shape.
STAMPING
-Use Memento ink to stamp the sentiment on the oval and using Granny Apple Green ink stamp the leaf images to the left of the sentiment on the oval.
-With Daffodil Delight Ink, stamp flower images on scrap of Basic White cardstock and fussy cut the flowers.
-On the White hexagon use Daffodil Delight ink stamping off once to use second generation ink with the image shown.
-Add stamped image as shown with Daffodil Delight on the Daffodil Delight hexagon.
-Add stamped image with Mango Melody to Basic Border shape.
EMBOSSING:
-Emboss the Basic White 2-1/2" x 4" piece using the Hive 3D folder
-Attach the Basic Border piece to the embossed piece.
ASSEMBLY:
-Adhere embossed piece to the 5-1/4" x 4" piece of Basic White as shown.
-Attach hexagons as pictured.
-Tie a large bow with the Crinkled Seam Binding and attach to the back of the oval.
-Add the flowers to the oval layer gluing some of them directly on the layer and popping some up with dimensionals.
-Use dimensionals to adhere sentiment layer to the card front.
EMBELLISH:
-Place Classic Matte Dots in the flower centers.
-Share with someone special!!!


No comments:
Post a Comment