Join

Join
Join My Team: Demonstrators and Discount Shoppers Welcome

PLEASE LEAVE YOUR EMAIL FOR NOTIFICATION OF MY CLASSES AND TO RECEIVE ALL MY FREE TUTORIALS

Please Subscribe for Current Posts and Newsletters

* indicates required

Friday, April 29, 2022

GET READY!!!!!

Tuesday, May 3rd the new annual catalog goes live!!  Do you have your new catalog??  If not just send me an email and I'll pop one in the mail to you.  One of the exciting things in this catalog are the new 2022-2024 in colors.  If you are a brights lover you are going to love these colors.  
Would you like to receive these new In Colors for free and receive a 20% discount on all your future orders?  If you order your starter kit (Pick $125.00 worth of product and pay only $99.00) between May 3-31 and Stampin' Up! will throw in ink pads, cardstock, designer series paper and grid paper in the new In Colors for FREE!!!!  There are no strings attached when you join so contact me for all the info!!

Here is a cute card using all the new In Colors, ENJOY!!!!


Create magic with the NEW 2022–2024 In Colors with this Paper Pumpkin kit! With vivid pops of green and red and a range of blues, these colors are perfect for fun festivities. Send your best wishes or happy moments with the large bold lettering and gorgeous gold foil details. Plus, you can also send gift cards with the included coordinating gift card holders!

As an added bonus, every May Paper Pumpkin subscriber will get the chance to win a GOLDEN Voucher worth $25 USD | $34 CAD in Stampin’ Up! products! The winners will find their Golden Voucher in their May 2022 Paper Pumpkin box. This is the perfect time to snag coordinating In Color products from the 2022–2023 Annual Catalog that will go live on 3 May 2022 in the online store!

Watch Sara in this video where she goes over her favorite features of the kit. 

See the kit Here


Deadline for ordering the May Paper Pumpkin kit is May 10, 2022


Wednesday, April 20, 2022

ONE DAY ONLY!!  THURSDAY APRIL 21ST, 2022, 

FREE SHIPPING!!

Stock up on all your supplies and take advantage of this great offer and don't forget we still have the last chance sale going on.  There are many items on sale that are marked down, some as much as 50%.

Here is a great card that uses the In Color Shimmer Vellum that is currently on the last chance sale.  I have loved using this vellum and am so sad to see it leaving.  It is so pretty and has the soft shimmer that adds just the right sparkle to your cards and projects.


A Little Paradise


Product List

Emboss the sentiment on a scrap of Basic Black and punch each end using the Lovely Labels Pick a Punch.
Die cut the palm tree and grass.
Glue the Shimmer Vellum to the Basic White piece as shown.
Attach the palm tree and grass.
Using the black dimensionals adhere the sentiment.
Glue the Basic White piece to the Pale Papaya piece and attach to the Basic Black piece with black dimensionals.
Attach the entire layer to the card base.
Share your card with someone special.


Monday, April 18, 2022

Mother's Day Tulips


Here is another great Tulip Card using the The Flowering Tulips Bundle.  This will be a great addition to the cards and 3D treat box that I am offering in my April Paper~N~Ink at Home Kit.  The deadline to sign up for the April At Home Kit is April 21st.  You can CLICK HERE to sign up for your kit now!!

Cutting and Scoring

Thick Basic White – 8-½” x 5-½”, score at 4-¼”
Basic White – scrap
Gorgeous Grape – 5-3/8” x 4-1/8”, scrap
Granny Apple Green - scraps
Highland Heather – 5-¼” x 4”, scraps
Vellum – 5” x 3-¾”
Ribbon – 18'

Instructions:

Stamp flowers with Highland Heather on Highland Heather cardstock adhere to Gorgeous Grape cardstock.
Die cut Vellum and adhere over Highland Heather.
Color ribbon with Highland Heather Stampin’ Blends and adhere to front of card, adhere to card base with dimensionals.
Make a small bow with remaining ribbon.
Die cut Basic White scrap with larger label die.  Stamp sentiment with Tuxedo Black Memento ink.
Stamp flowers with Highland Heather on scrap Highland Heater then die cut.
Stamp leaves with Granny Apple Green on scrap Granny Apple Green then die cut.
Die cut tulip flower from scrap Highland Heather and add Highland Heather ink with Blending Brushes.
Add flowers, leaves and bow to label with glue dots and mini dimensionals.
Add brass butterflies.
Die cut flowers and grass from Granny Apple Green and Gorgeous Grape.  Cut flowers off the Granny Apple Green and adhere over the Gorgeous Grape.  Adhere to inside of card.
   Share your card with your Mother!!!!


Thursday, April 14, 2022


TULIP LOVE
Here in the Northwoods of Wisconsin we are still getting snow, so spring is not in the air but one can hope!!  This Flowering Tulips Bundle is fast becoming a favorite of mine.  Here is a card that I "cased" (Copy and Share Everything) from a photo in the January to June Mini catalog.  I've included the dimensions and instructions below for you.  I also have my Paper~N~Ink at Home Kit that features this set for the month of April.  The deadline for ordering is coming up fast so sign up soon, you won't be disappointed in this happy, spring time set or the special mystery gift that I am including in each kit!!!!!  All the kit details are listed below this post.

Product List
Cutting and Scoring
So Saffron - 5 1/5" x 8 1/2" scored at 4 1/4"
Soft Succulent - 5 1/4" x 4"
DSP - 5 1/8" x 3 7/8" 
Die Cut
White tag using the third largest tag and a yellow tag using the same die.
4" Green Ribbon
10" Baker's Twine
Stamping
Stamp sentiment on yellow tag as shown. 
Stamp tulip with Mango Melody ink on white tag, coloring the center in using the Dark So Saffron Blend Marker.  Stamp the stem and leaf with Soft Succulent ink.
Add Wink of Stella to the outer edge of the tulip.
Assembly
Glue the layers as shown
Run the green ribbon through the holes of the tags and glue the tags together as shown.
Attach the tags to the card with Dimensionals.
Tie the baker's twine around the green ribbon and trim all tails.
Add the Brushed Brass Butterflies.
Share with someone you love.

Friday, April 8, 2022

Just Paper~N~Ink at Home
April 2022
Flowering Tulips


This month's at home class makes these adorable tulips.  Above are a few sample from Stampin' Up!  The dies cut out realistic 3D flowers.  Your kit will include enough cardstock to make six cards from three different designs and create two treat boxes.  I will include all the instructions and a mystery gift.  Your At Home Kit will also include:  In Colors DSP, White Organdy Ribbon, In Color Jewels and Opal Round Gems.  I will precut your cardstock and include special die cuts that are not included in the Flowering Tulips Bundle.  You will need the Flowering Tulips Bundle to complete your kit.  If you purchase the bundle with your kit I will pay for your shipping and tax on the bundle.  Order soon, class registration will close on April 21, 2022.


Tuesday, April 5, 2022

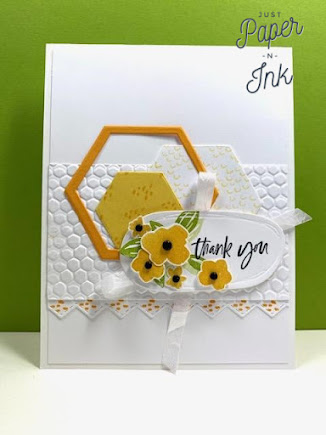
Hello Beautiful~Thank You 


Product List

CUTTING & SCORING

-Basic White Thick:  11 x 4-1/4" scored at 5-1/2"
-Basic White:  5'1/4" x 4" and 2-1/2" x 4".  Die cut largest oval.  Die cut second largest hexagon.  Die cut border image.
-Mango Melody:  hexagon outline using largest and next smaller layering dies.
-Daffodil Delight:  Die cut smallest hexagon shape.

STAMPING
-Use Memento ink to stamp the sentiment on the oval and using Granny Apple Green ink stamp the leaf images to the left of the sentiment on the oval.
-With Daffodil Delight Ink, stamp flower images on scrap of Basic White cardstock and fussy cut the flowers.
-On the White hexagon use Daffodil Delight ink stamping off once to use second generation ink with the image shown.
-Add stamped image as shown with Daffodil Delight on the Daffodil Delight hexagon.
-Add stamped image with Mango Melody to Basic Border shape.

EMBOSSING:
-Emboss the Basic White 2-1/2" x 4" piece using the Hive 3D folder
-Attach the Basic Border piece to the embossed piece.

ASSEMBLY:
-Adhere embossed piece to the 5-1/4" x 4" piece of Basic White as shown.
-Attach hexagons as pictured.
-Tie a large bow with the Crinkled Seam Binding and attach to the back of the oval.
-Add the flowers to the oval layer gluing some of them directly on the layer and popping some up with dimensionals.
-Use dimensionals to adhere sentiment layer to the card front.

EMBELLISH:
-Place Classic Matte Dots in the flower centers.
-Share with someone special!!!